Author Archive

Fitzroy SQ London

May 5th, 2023 | Case Studies

Fitzroy SQ London

PROJECT DESCRIPTIONS

Complete Turnkey Solution for A Victorian Grade II Listed Building

Our contribution within the Fitzrovia area through work efforts and work ethic individually and collectively didn’t go unnoticed, the team did such a marvellous job that the neighbours commissioned London Building Contractors for much bigger projects.

Commissioned to outlines the full building general maintenance and restoration as outlined in the work scope and in the contract. London Building Contractors is fully responsible for assisting in restoring / maintaining the above property.

Our goal was to provide a comprehensive Survey & Inspection Report. Staying informed is essential and also help determine how to navigate and reduce future repair costs and increase life expectancy. Identify and address potential problems areas to minimize current damaged Exterior and Interior Structure. Early detection of current defects eliminates the stress, hassle and costs of emergency repairs when bad weather occurs. Utilize the inspection report findings to prepare and budget for future expenses.

Major building and facility repair and replacement: repair or replacement of complete or major portions of the Victorian Grade II Listed Building and facility systems at irregular intervals which is required to continue the use of the building and facility at its original capacity for its original intended use, the level of sophistication of the project scope required a guaranteed and was accomplished in a timely manner.

Ealing West London

May 5th, 2023 | Case Studies

Ealing West London

PROJECT DESCRIPTIONS

This project focused on the comprehensive renovation of three key areas within the property: the bathroom, kitchen, and living room. Our team applied their expertise to deliver outstanding results, transforming each space into a functional and visually appealing environment.

In the bathroom, we began by stripping out the old units and carefully repairing the walls to ensure a solid foundation for the renovation. New tiles were expertly installed, creating a modern and easy-to-maintain surface. We then fitted new units, enhancing the bathroom’s functionality and style.

The kitchen underwent a complete transformation, starting with the removal of all existing units. Our team attended to the electrical work, ensuring a safe and efficient setup for the new appliances and fixtures. We installed a new radiator, air vent, and wallpaper to create a comfortable and inviting atmosphere. A modern combi boiler was added for improved energy efficiency, while new tiles and a gas cooker brought style and functionality to the space. A new fridge and updated electrics completed the kitchen renovation, ensuring a seamless integration of appliances and design elements.

In the living room, we removed the old units and focused on revitalising the walls with expert rendering and a fresh coat of paint. The addition of spotlights created a warm and welcoming ambiance, perfect for relaxing and entertaining.

This project is a testament to our ability to tackle multi-room renovations with precision and care, delivering exceptional results that meet and exceed our clients’ expectations. The expertise and craftsmanship of London Building Contractors shine through in every aspect of this transformation.

Ealing London

May 5th, 2023 | Case Studies

Ealing London

PROJECT DESCRIPTIONS

Each project bring different challenges. This is another complicated project required 5 project management principles (PMP)

  • Address important questions at the beginning of the project.
  • Sketch out a scope and goals for your project.
  • Communicate roles, expectations, and our objectives as a team.
  • Monitor progress and identify roadblocks.
  • Making sure all deliverables have been met and finalize the project timeline and budget. (contingency)

Conversion of an existing house to an L-shape opened plan luxurious and spacious extension, with various updates to the property we were able to take an advantage in demonstrating our ability to deliver exceptional results while enhancing both the aesthetics and functionality of the property.

The construction process began with a simple trench foundation detail, as approved in the original drawings, however this was not the best option as we discovered there are 3 active and inactive Manholes. Although approval were granted for double sealed by Thames-water and the Local Council but we’ll never build on Manhole regardless the condition for obvious reason. Therefore we had to go back to the drawing board. New plan means endless telephone calls and email exchange with all parties involved whilst preparing drawing updates and ensured all gel together swift without delay on project progress.  Eventually we closed all 3 Manholes completely and sealed channel using earth elements. Then established new channels to accommodate new Manholes and construction. This was done successfully only then we were happy to proceed with foundation, even so we had to settle for a raft foundation design option (each project bring different challenges).

Expertly laid external brickworks to match the existing structure, ensuring a seamless and cohesive appearance. Repeated same principle during construction of brick wall fencing.

All  Our team installed insulation to optimise energy efficiency and fitted lintel for added support and stability. We also replaced the door, enhancing the property’s overall design and security. Installed drainage channel and water pipes, ensuring a long-lasting and efficient solution for the property waste management. Our team then focused on the interior, updating the flooring throughout the home with durable and visually appealing materials.

Spotlights were installed to create a warm and inviting atmosphere. Our team also took care of the underlayment and floor screeding, ensuring a solid foundation for the new flooring.

As a finishing touch, we installed skirting boards and other details, bringing a sense of unity and polished to the space.

Extension built with a large French door access with large window profile complementing the surrounding whilst enabling free flow of air and natural sunlight.

THE EDWARDIAN ARCHITECTURAL STYLES

April 18th, 2023 | London Building Contractors

Although the Edwardian period lasted only 10 years, the stretch of its architecture continued for more 10 years after King Edward’s death. In embracing less formality on buildings, the dark, stuffy cluttered interiors of the Victorian architecture was modified in this era to add more lighting, space and air into homes. This then is the Edwardian Architecture.

Currently, Edwardian houses are mainly located in Muswell Hill, Hampstead Heath, Dulwich, Blackheath, Ealing, Richmond and Putney still having a reputation for being well designed and constructed using high-quality materials.

EDWARDIAN SUBURDIA

EDWARDIAN-SUBURDIA

This was mainly residential architecture characterized by small terraced, semi-detached and detached two-storey buildings. These Edwardian country houses were so close to railway stations for an easy commute to the city and therefore dominate many suburban areas and commuter villages.

Domestic improvements were continuously made possible due to the availability and easy access of the advanced building materials like glass used on the large windows, glossy paint which replaced wall papers. Furthermore, electric lightings and gas appliances were later introduced towards the late Edwardian period.

Identifying an Edwardian suburbia home

  • Externally, these homes are characterized by steep-pitched roofs.
  • The roofs have chimneys often located part-way down the roof, directly above the fireplaces in the rooms below.
  • Dormer windows with pointed barge-boards and the loft-space has being used for accommodation.
  • Larger but fewer rooms as compared to the Victorian buildings
  • Fewer, larger rooms, double-aspect living spaces and large hallways.
  • Front gardens (many of which have since been converted to driveways) and generous back gardens.

EDWARDIAN BAROQUE

The Edwardian Baroque architecture dominated most commercial buildings this being termed ‘the Grand Style’ between 1910s and 1920s. This style was designed by a major exponent in the times, Sir Edwin Lutyens. The Baroque style was mainly adapted from the architecture of France(18th century) and the architecture of Sir Christopher Wren in England (17th century).

Identifying an Edwardian Baroque home

  • Extensive rustication, especially at ground level, running the voussoirs of arched openings
  • Domed corner rooftop pavilions
  • Exaggerated keystones, segmental arched pediments,
  • Columns with engaged blocks;
  • Colonnades of (sometimes paired) columns in a Ionic order)
  • Domed towers modelled closely
Cadiff City Hall, 1906

Cadiff City Hall, 1906

The Manchester Victoria station, 1909

The Manchester Victoria station, 1909

HERITAGE IMPACT ASSESSMENT (HIA)

April 17th, 2023 | London Building Contractors

Heritage properties are the bridge between the past of a state and its future. If not closely monitored and assessed, the continuing rapid urban development is likely to choke the existence of these heritage properties. Heritage Impact Assessment, when effectively carried out, helps to reduce friction between urban development policies and heritage conservation.

Just like Environmental Impact Assessments (EIA) are carried out to preserve the sustainability of the environment after execution of a project, likewise a Heritage Impact Assessment is carried out to preserve the Outstanding Universal Value of a Heritage property when directly involved in a development plan.

Heritage Impact Assessment (HIA) is an assessment tool is used to identify and analyze impacts of human activities on a state’s heritage properties by maintaining a balance between heritage protection and urban development for sustainability. Therefore, all parties involved in the HIA process must have a good understanding of the Heritage property, its significance and Outstanding Universal Value (OUV), its attributes and its context.

Objectives of carrying out an HIA

  • To identify and protect heritage properties by maintaining their Outstanding Universal Value (OUV).
  • The strengthen the management and governance of World Heritage properties.
  • To reduce the possible dangers associated with Heritage properties
  • To make sure development or change does not impact negatively on the outstanding universal value, integrity and/or authenticity of the property.
Location

Heritage Impact Assessment Process

An effective Heritage Impact Assessment depends on information obtained from the search as it will aid in the decision agreed upon by all the involved and concerned parties. It is important that early and continued consultations with all relevant parties concerning the scope and expectations of the HIA be carried out before the proposed work or development plan is implemented. These consultations help to identify any expected negative impacts early so as to inform both the development design and the planning process.

The scoping report should make it clear what is to be done, why and how, when and what are the expected output. Below are important questions to guide you during a Heritage assessment:

  • What is the heritage at risk and why is it important (It’s OUV)?
  • How will the development proposal impact its OUV?
  • How can these effects be avoided, reduced, rehabilitated or compensated?
Stages of Heritage Impact

Stages of Heritage Impact Assessment Process

  • Initial development plan
  • Early consultation from all concerned authorities
  • Identification and recruiting of suitable organizations to undertake works
  • Establishment of the study area and scope area
  • Collect and collate data as per the development plan
  • Characterize the heritage resource by identifying the attributes that convey its OUV
  • Modelling and assessment of both direct and indirect impacts of development plan
  • Draft proposed mitigation measures (avoid, reduce, rehabilitate, compensate)
  • Moderation of the assessment results and mitigation measures.
  • Final reporting and illustration to guide in decision making
  • Mitigation/ Implementation of development plan if approved

Want to assess or renovate your property, but you don’t seem to know where to start?
Careful who you turn to! London Building Contractors is all you need!
For all your building concerns? Contact London Building Contractors
A Complete-Turnkey-Solution-For-You

EDWARDIAN ARCHITECTURE 1901-1910

April 17th, 2023 | London Building Contractors

After the Victorian era, building of many more of London’s houses in the terraced style sparked the beginning of the Edwardian Architecture. The Edwardian architecture is an architectural style that arose during the reign of King Edward VII of the United Kingdom from1901 to 1910.

As previously discussed, the Victorian period introduced mass housing, which aimed at expanding the middle-class people, who were at initial stages of gathering wealth. This period enabled many to live in properly constructed homes with appropriate sanitation. However, in the east of the city in areas like Whitechapel and Spitalfields, slums started to develop, as more people relocated to the city in search of work opportunities. Also, the population within the city was rapidly increasing due to the introduction of the new railways sparked the increasing relocation of people into the city causing an increase in the suburbs.

No doubt the Edwardian architecture was a blend of the Victorian architecture, with less ornate than the late Victorian architecture. This construction was mainly terraced, semi-detached and partly detached villas but these were smaller than those in the Victorian era. Externally, you can often identify an Edwardian home by the Dutch gables, sash windows and deep bay windows. Edwardian homes also are often half-clad in timber or sub-divide windows into smaller square panes in order to create an aesthetic appeal.

EDWARDIAN ARCHITECTURE 1901-1910

Edwardian properties till date, are often much shorter than the Victorian homes since they had a less need for servants.

Characteristics of Edwardian homes

EDWARDIAN ARCHITECTURE 1901-1910

Various Edwardian homes in London.

For all your building concerns, Contact London Building Contractors
A Complete-Turnkey-Solution-For-You

Architectural Lighting Vs Decorative Lighting

April 17th, 2023 | London Building Contractors

A room’s lighting is what drives one focus to specific sections in an interior space but to achieve this, you need to understand how to best distinguish the light fittings involved in the lighting process. Different bulbs are designed with different wattages and designs but more to these are the categories in which they are grouped, Architectural and decorative lights. To create a successful balance between lighting and architecture, you need to consider the aesthetics, function, and efficiency of the lightings and the space. The combination of these 3 key considerations when observed, a perfect interior is no option.

DECORATIVE LIGHTING

DECORATIVE LIGHTING
These are designed to be seen, to draw one’s attention into their display due to its unique beauty. It adds a lot of beauty to a space as a major reason for its installation alongside complimenting to ambient and task lightings within the space.

When to best use decorative lights.
Less lighting on ceilings. The decorative lights help supplement on the lighting in a space. Just incase one wants to maintain few lighting points on the ceilings, pendant lightings can be a great additive. Glass pendants usually hang down from the ceiling, adding elegance to the space.
Lamp lights also play a good supplementary role in such scenarios as they emit light in interior corners/ target locations identified like tassels, a fringe, a contrasting braid, or an interesting patterned design.

ARCHITECTURAL LIGHTING

Architecture fully relates to the art or practice of designing and constructing buildings making it a more general concept in building design. Architectural lighting works to serve and enhance the architecture, not merely as an accessory. So, architectural lighting is an intersection of art (architecture) and technology (lighting). The architecture being illuminated or lighted may be commercial or residential. This lighting mainly draws focus to an actual item or space. However, there is no real fitting involved. Its main purpose is to draw attention to the art below it.

ARCHITECTURAL LIGHTING
For all your building concerns, Contact London Building Contractors
Complete-Turnkey-Solution-For-You

Modern Homes Vs Traditional Homes

April 17th, 2023 | London Building Contractors

COMPARISONS BETWEEN MODERN
HOMES AND TRADITIONAL HOMES

Many believe a traditional/heritage home must be old in age or existence while the modern home is the latest luxurious kind. Traditional and modern homes don’t necessarily mean old or new respectively. These sail as far as the building designs, materials used, origin, architecture, historic components. Most heritage homes are traditional homes by virtue of their dominating similarities. The specifics in comparing these two sets of homes, if known to one, best guides their choices in which home to look out for.

Architecture

Ancient architecture is defined by the elegant and rich designs while modern architecture seeks maximizing every utility while minimizing costs. Most traditional homes are characterized by voluminous designs and rare materials, integrating many single units to form a huge structure. These were built by the local artisans carefully paying attention to every detail as built. In summary, one can say these buildings were over designed and this explains why they have stood the test of time. Maintenance therefore comes costly for most traditional homes.

Modern homes or structures are usually designed to last a specific period of time beyond which they’ll require demolition or upgrading. Modern home constructions are implemented while incorporating building principles, scheduling and management

Architecture
Lighting and openings

Lighting and openings

Traditional homes, due to the various internal partitions called for many window and door openings to light up the different rooms. Traditional homes usually have smaller, symmetrical windows of the same sizes and shapes accommodating the different room partitions. Less heating appliances were used which limited the demand for abundant aeration through larger doors and window openings.

Due to the various flexible door and window designs and sizes, modern homes have taken full advantage of this revolutions due to increasing bills associated with lighting a building. Door and windows not only serve as openings and access, but are today a source of abundant natural light into a home at little or no cost.

Space partitions

Most traditional homes though spacious in the internals, were/are divided into smaller rooms because these were designed for households which were in larger numbers than they are today. Larger spaces were mainly designed for general rooms like dinning and sitting rooms.

Today, the more space there is in a structure, the more comfort associated to it. The way of life today is dominated by a demand for people to work within their homes with less destructions thus aiding the need for comfortable space with less occupants. Therefore, modern homes make the most of space, with multi-purpose rooms having less walls to serve the needs of its occupants yet with minimal inconveniences within the building.

Space partitions
Materials

Materials

Far from just rich architectural designs, materials used in traditional buildings were abundant but with little or no alternative options. Today, these are now expensive and rare to find for example gold, terra Cota bricks but have been replaced with various options like concrete bricks. Due to their abundance in quantity at the time, these materials were used unsparingly to bring the best out of a structure’s appearance. The old designs were disadvantaged by limited material options and designs unlike modern buildings. A variety of building materials, finishes, furniture have been introduced overtime to match the rapid development of architecture.

One of the major reasons for high maintenance and renovation costs in traditional homes is due to the scarcity of the original materials used as it requires that the originality of a structure be maintained especially with listed heritage buildings. Modern homes, alternatively are built with less material but with achieved maximum elegance and beauty due to economic reasons. Construction is usually done today to maximize the utilities but with minimal expenses.

Want to assess, renovate or buy a heritage home, but you don’t seem to know where to start? Or perhaps you want a modern dream home? For all your building concerns, Contact London Building Contractors
A Complete-Turnkey-Solution-For-You.

Foundation Systems And Soil Types

April 17th, 2023 | London Building Contractors

While seemingly innocuous, the soil type could have a dramatic impact on your project. Michael Holmes analyses the various ground conditions and foundation solutions, revealing their cost

Foundation Systems And Soil Types

Soil Types

A good starting point is to call your local authority Building Control department. They should be willing, informally, to give you an idea of the typical soil type in the area you are building, and the sort of foundation that is appropriate.

Usefully, most local authorities produce a fact sheet on typical foundation solutions for different soil types commonly found in the area.

Rocks such as limestone, granite, sandstone, shale and hard solid chalk have a high bearing capacity. The rock may simply need to be stripped back and levelled off to build from.

Rock can be impervious, so topsoil is likely to require drainage as it is not possible to build soak ways to dispose of rainwater or surface water. Off-mains drainage options will also be very limited.

Foundation Types

A quick guide to the most common types of foundation

Repointing Brick And Stone Walls

April 16th, 2023 | London Building Contractors

Masonry walls are built of a series of individual units – generally brick, stone or flint – with mortar acting as the glue that holds them together. The external face of the finished wall therefore consists of masonry units separated by mortar joints. These joints are known as pointing.

Mortar basically comprises an aggregate (sand) held in a matrix by a binder. In old walls the latter ingredient was usually lime, but might be earth or a combination of the two. Stone walls were often built with earth-lime mortar, for example, but pointed using lime.

What is pointing?

The most obvious purpose of pointing is to fill the gaps between the masonry units. This stops them from becoming loose and prevents water, draughts and foreign material such as dirt and vegetation from penetrating the wall.

Even more crucial is pointing’s role in managing moisture in the wall fabric. Old bricks are soft and permeable, while stone varies greatly from soft sandstones to very hard flint – but is generally relatively soft and permeable.

These materials absorb water readily; becoming wet when it rains and then drying through evaporation. The lime mortar pointing is also soft and permeable, which helps to ensure that this cycle of absorption and evaporation can continue to take place over the whole wall surface.
Over a long period of time, this #repeating cycle causes erosion of the surface of the material. If there is a frost while the wall fabric is still wet, the water in the wall freezes and expands, causing damage to the surface.

To mitigate this, the #pointing mortar is intentionally made softer and more permeable than the masonry units. This ensures moisture is concentrated in the mortar joints as opposed to the wall fabric. Most of the evaporative drying therefore happens in the pointing rather than the #bricks or #stones.

What is pointing

When there is a frost, the majority of the water will be in the mortar joints. This means most of the erosion and freeze/thaw damage is limited to the pointing.

This sacrificial function is fundamental to ensuring the long-term performance of a wall. The valuable and hard to replace brick or stone is protected at the expense of the mortar joints, which gradually erode over time.

Eventually the exposed mortar will have degraded to the point that it is no longer performing effectively and repointing is necessary. In normal conditions this can be expected to be a once in a generation task.

What can go wrong?

The most common problem you’re likely to encounter is that previous repointing has been carried out using inappropriate mortar.

Modern versions use Portland cement as a binder. This creates a hard, impermeable mortar that suits modern bricks that have been fired at very high temperatures. When used with the softer masonry units in old walls, however, it can have very serious consequences.

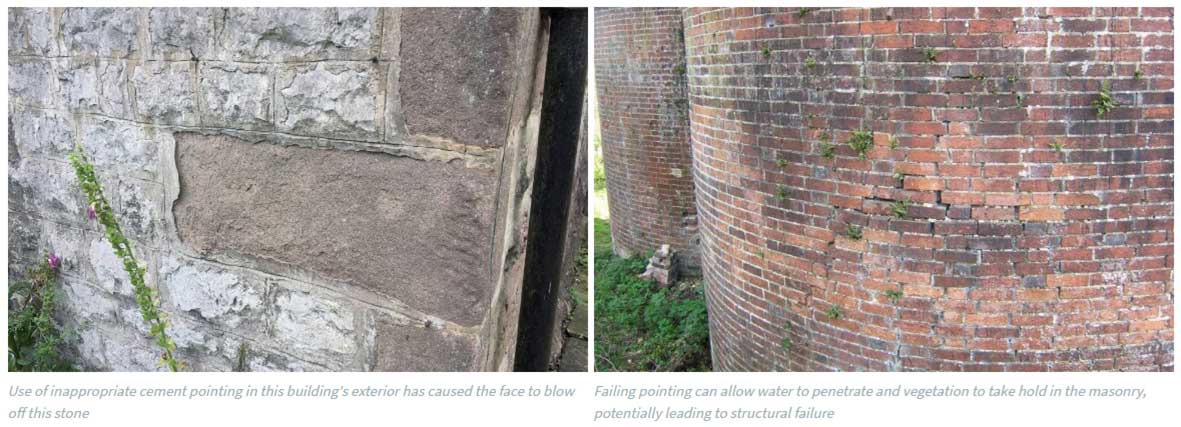
In period properties, cement mortar blocks the evaporation route through the mortar joint and concentrates water in the bricks or stones, causing these to erode instead of the pointing. When there’s a frost the wet masonry units are then subject to freeze/thaw action.

This causes spalling of the face of bricks, where the protective skin on the surface is blown off. In severe cases whole bricks or soft stones can completely disintegrate.

The hard, inflexible modern cement #pointing is incompatible with the soft, flexible mortar behind it and begins to crack and fail. This allows water into the wall fabric, where it becomes trapped, which can ultimately cause the core of the wall to degrade.

In addition, contrary to what you might expect, cement pointing in an old wall will fail much more quickly than softer lime versions.

When pointing does start to fail, whether through natural erosion of lime mortar or the failure of inappropriate cement mortar, the ability of the wall to manage moisture is compromised and it will tend to become damp.

Ultimately, the wall’s structural integrity will be compromised. Roots and germinating seeds of plants can start to grow in failed joints, causing serious problems as they expand.

When to repoint old walls

A wall with soft mortar pointing needs to be repaired once the mortar has eroded well behind the face of the masonry units. Erosion will occur unevenly over the surface of a wall; the time for repointing has come when the mortar has receded 5mm to 10mm back from the face.

If a wall has been repointed using cement the work will almost certainly need to be redone with lime mortar at some stage. Judging when to do this is not necessarily straightforward.

If the pointing is failing, the wall is becoming damp or masonry units are starting to degrade then repointing is urgently necessary. However some walls repointed in cement, particularly those in sheltered positions, can continue for a considerable time without showing any adverse effects.

Repointing tips

Attempting to remove the cement pointing, especially if it is still sound, will inevitably cause some damage to the masonry units – so it is best to hold off if there are no problems. Because of the incompatibility of materials, the cement will begin to fail at some stage. This is the time to #repoint; when it is much easier to remove.

How to repoint

The good news is this is a relatively straightforward job that can be undertaken by any competent person with a bit of instruction and training.

The first stage is to rake out the old pointing to remove any failing mortar and provide sufficient depth (10mm) to key the new pointing. You’ll also need to get rid of any very loose and friable mortar, which might involve going deeper.

With a stone wall in poor condition that might be very much deeper. If you get to the stage where the stability of masonry units or integrity of the wall deteriorates, then it is time to call in an expert.
Once the joints have been raked out, they must then be dampened with a fine water spray. This step helps to prevent the new pointing from drying too quickly and failing.

The new mortar is then forced into the joints with a pointing iron or small trowel, ensuring that it is well packed and finished slightly proud. For very deep joints this will be a two stage process, allowing the first stage to go off before progressing to the second.

Once the mortar has started to harden (when it can just be marked with a thumbnail) it should be knocked back into the joints. Finally the pointing should be rubbed back to just behind the masonry units, making sure that it does not go over their edges.

The surface finish should be a rough, open texture to maximise the potential for evaporation. Struck pointing or ribbon pointing, seen much too often in the repair of old walls, is not appropriate either visually or functionally.

Some walls were originally pointed using specialist decorative techniques. These include tuck pointing – popular in Georgian brickwork – and galleting (the incorporation of stone chips in thick joints of stone or flint walls). These are specialist techniques that will require an experienced craftsman.
What pointing mortar should I use?

The best bet is to try to match the original pointing mortar as closely as possible. This is most likely to be compatible with the particular brick or stone used to build the wall originally. It will also maintain the appearance of the wall and help to ensure it fits in with the local vernacular tradition.
Lime mortars fall broadly into three categories, each of which has different properties and applications:

Hydraulic mortars

These include material that causes them to set quickly and develop higher strength than other lime mortars.

They vary greatly in strength, with those at the top of the scale becoming even harder than cement. They are rarely appropriate for repointing old masonry but the weakest hydraulic mortars can be used in exposed situations with very hard stone. Great care must be taken if you’re considering them.

Lime putty-based mortars

These are non-hydraulic. Formed by slaking quicklime, the putty is used as the binder and mixed with carefully-selected sharp sand. This is widely available in ready-mix form, and can be stored almost indefinitely before use, provided air is excluded.

It is straightforward to use and sets as a result of exposure to CO2 in the air. It provides a soft, flexible and highly breathable pointing that is compatible with most old masonry.

Hot mixed lime mortar

This is also non-hydraulic, but is made onsite by combining quicklime, sand and water. Quicklime is hazardous and requires careful handling – nobody should attempt hot mixing without proper training. It makes a very workable mortar that is extremely easy to use.

Hot mixed lime mortar pointing has exceptional moisture management properties, actively wicking water from the surrounding fabric. It is by far the best material to use in damp masonry, as it dries walls out quickly and effectively.

×